Example demonstrating connectivity to an MQTT broker
Published by 
Eclipse Ditto can now connect to MQTT 3.1.1 brokers.
Perfect timing to happily welcome a new colleague to our team behind Eclipse Ditto: David.
In order to get familiar with Ditto and the development with digital twins, David was assigned with one of his first tasks to get his hands on one of our newest features, MQTT connectivity which was released recently with milestone 0.8.0-M2.
On his journey into digital twin land he made a great example with an ESP8266 powered board connected via an MQTT broker to Ditto and published it to the Eclipse Ditto examples repository:
This example is about how to communicate between device and solution in a two way pattern through Ditto using MQTT. This means we will add a policy, a thing and a MQTT connection to Ditto. When Ditto ist set up and working, we will create real world device (“octopus board”) and connect it to it’s digital twin via MQTT.
At the end, we will create a basic frontend webapp. The webapp will automatically connect to Ditto when you type in your credentials, automatically pull your things and show them in a list.
You can create, modify and delete devices in the webapp and if there is a real world device connected to the thing in the list, you can send it a command message to control any feature on it. The list of things will always be up-to-date when you listen to server-sent-events, which you can activate easily with pressing a button.
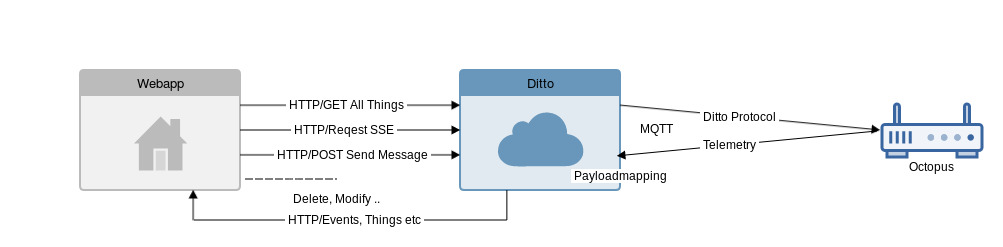
We will use an Octopus-board with an ESP8266 on it. It has several sensors built in, but for simplicity we will just use it’s temperature and altitude sensor.
To show the functionality of Eclipse Ditto messages, we will switch on/off a LED on the Octopus-board through it.
If you have any wishes, improvements, are missing something or just want to get in touch with us, you can use one of our feedback channels.

–
The Eclipse Ditto team